
1. Create a Theme: To create a new theme, run the following command from your project root:
- php artisan create:theme
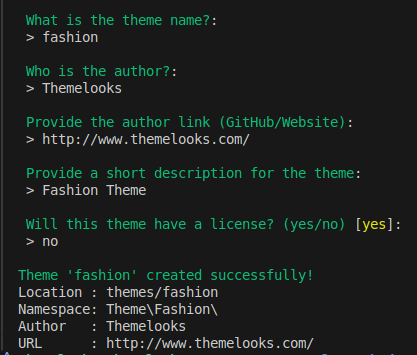
When the theme is created successfully, a new folder will appear inside your themes directory with your theme name.
For example, if your plugin name is fashion, the structure will look like this:
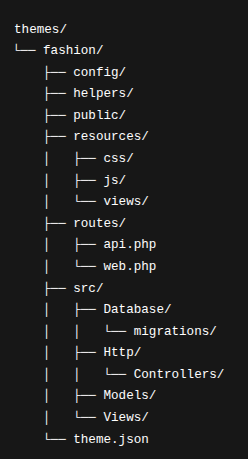
- config/ – Configuration files for the theme.
- helpers/ – Helper functions used by the theme.
- public/ – Public assets (images, compiled CSS/JS, etc.).
- resources/css/ – Theme CSS source files.
- resources/js/ – Theme JS source files.
- resources/views/ – Blade templates for the theme layout and pages.
- routes/api.php – API routes related to the theme (if needed).
- routes/web.php – Web routes for the theme.
- src/Database/migrations/ – Migration files used by the theme.
- src/Http/Controllers/ – Controller classes for theme-related logic.
- src/Models/ – Models used by the theme.
- src/Views/ – Additional internal views for the theme.
- theme.json – Theme metadata and basic configuration.
2. Create Theme Migration: To create a migration file for your theme, use:
- php artisan create:migration theme create_table --path="your-theme-name"
Example:
- php artisan create:migration theme create_your_table_name_table --path="fashion"
Note:
- Replace your_table_name with your actual table name.
- "your-theme-name" is the theme name. Replace "your-theme-name" (for example "fashion") with your own theme folder name.
After the migration is created, you will see the new migration file in this location inside your
theme: themes/your-theme-name/src/Database/migrations
3. Run Theme Migration: After creating the migration, run the theme migration with:
- php artisan exec:migrate theme your-theme-name
Note: Here again, "your-theme-name" is your theme name. Replace "your-theme-name" (for example "fashion") with your actual theme name.